RESTORING a 1941 DODGE COE
Let's get into detail on this page on exactly how a full restoration comes to life. Here I will house the step-by-step process of my own restoration on a 1941 Dodge C.O.E (Cab-Over-Engine).

Let the vehicle find you. Why do we like a certain type of automobile? The way it looks, maybe its rare..or maybe its valuable..perhaps the history or nostalgia . Sometimes it is difficult to know exactly, but we all have this ability to find unique 'appeal' and 'connection' regardless of the art-form.
It took 12 years of constantly nagging the owner, until in 2019 he finally decided to sell. The truck is in its original state and requires a full restoration. Check out the video - it has been sitting in this spot since 1988!


Frame off restoration...remove the cab, engine and strip down every nut & bolt to the bare frame. At this stage, it doesn't look like much as the truck is taken down to its most basic form so everything can be inventoried, evaluated for restoration or replacement.
Getting it ready for sand-blasting then I extended the frame by 12 inches at the back as I plan my deck (and special haul).
FIND YOUR PROJECT
TEAR-DOWN & BLAST


ENGINE REBUILD
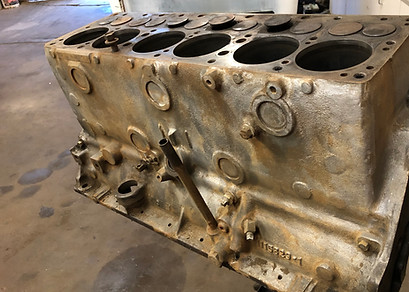
1941 Dodge power house was a 228 cubic inch 6 cylinder producing about 100 horsepower. The engine didn't run after sitting for so many years...and from the tear down it was apparent that the compression rings were broke and some valves were stuck. Cylinders are in great condition but since I have it in tear down I will be replacing connecting rods, bearings, rings etc....will be a new engine when done.

TIRES & WHEELS


BODY & PREP
Apply basecoat to the wheels before mounting. The split rim ring is powder coated for durability. After mounting with new rubber I go in and spray base color, pinstripe and then clear coat.
The most relaxing part of restoring is body work. Fortunately with 1941 sheet metal there is more material in this cab then 5 Toyota Corolla's combined. After blasting, hammer and dolly the dents, mig weld if needed, pick & file and only a slight coat of poly is needed in the end. The larger trucks have the advantage of sitting up high off the ground so rust over the years is minimal on this '41...I was surprised the metal was in such good shape (even for a Dodge).


